Entering a Claim Web Page
Overview - The Claims Entry function allows the user to enter and submit a claim directly from the Web Portal.
Entering a Claim: Web Page Image(s)
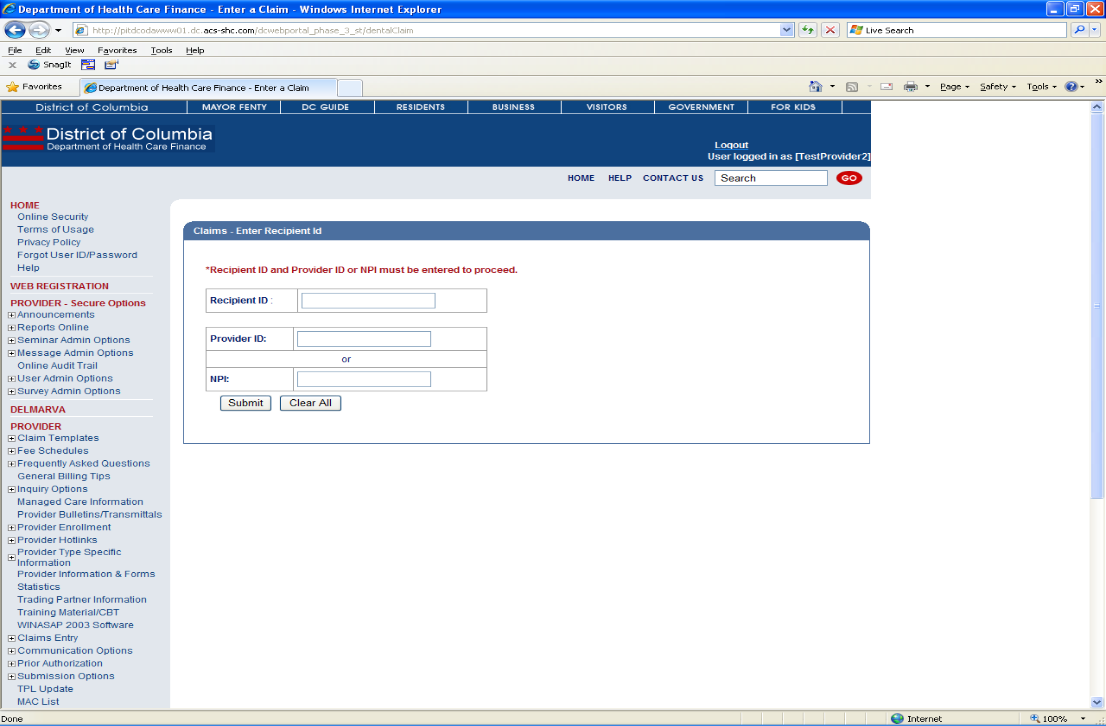
Figure 237: Claims Entry

Entering a Claim: Web Page Details
- After logging in to the secure Web Portal, on the left side of the Home Pagein the navigation bar, the user should click the '+' to expand the options for Claims Entry.
- The user will click on the claim type they wish to enter. The options are ADA Dental, Adjustment/Void, CMS-1500, LTC Group Claim, or UB04.
- If the user clicks ADA Dental, CMS-1500, or UB04, they will be taken to the Claims page where they will enter the Recipient ID and the Provider ID or NPI. After completing those fields, the user clicks Submit to access the claim form.
Figure 238: Claims Entry Web Page Image
Entering a Dental Claim: Web Page Image
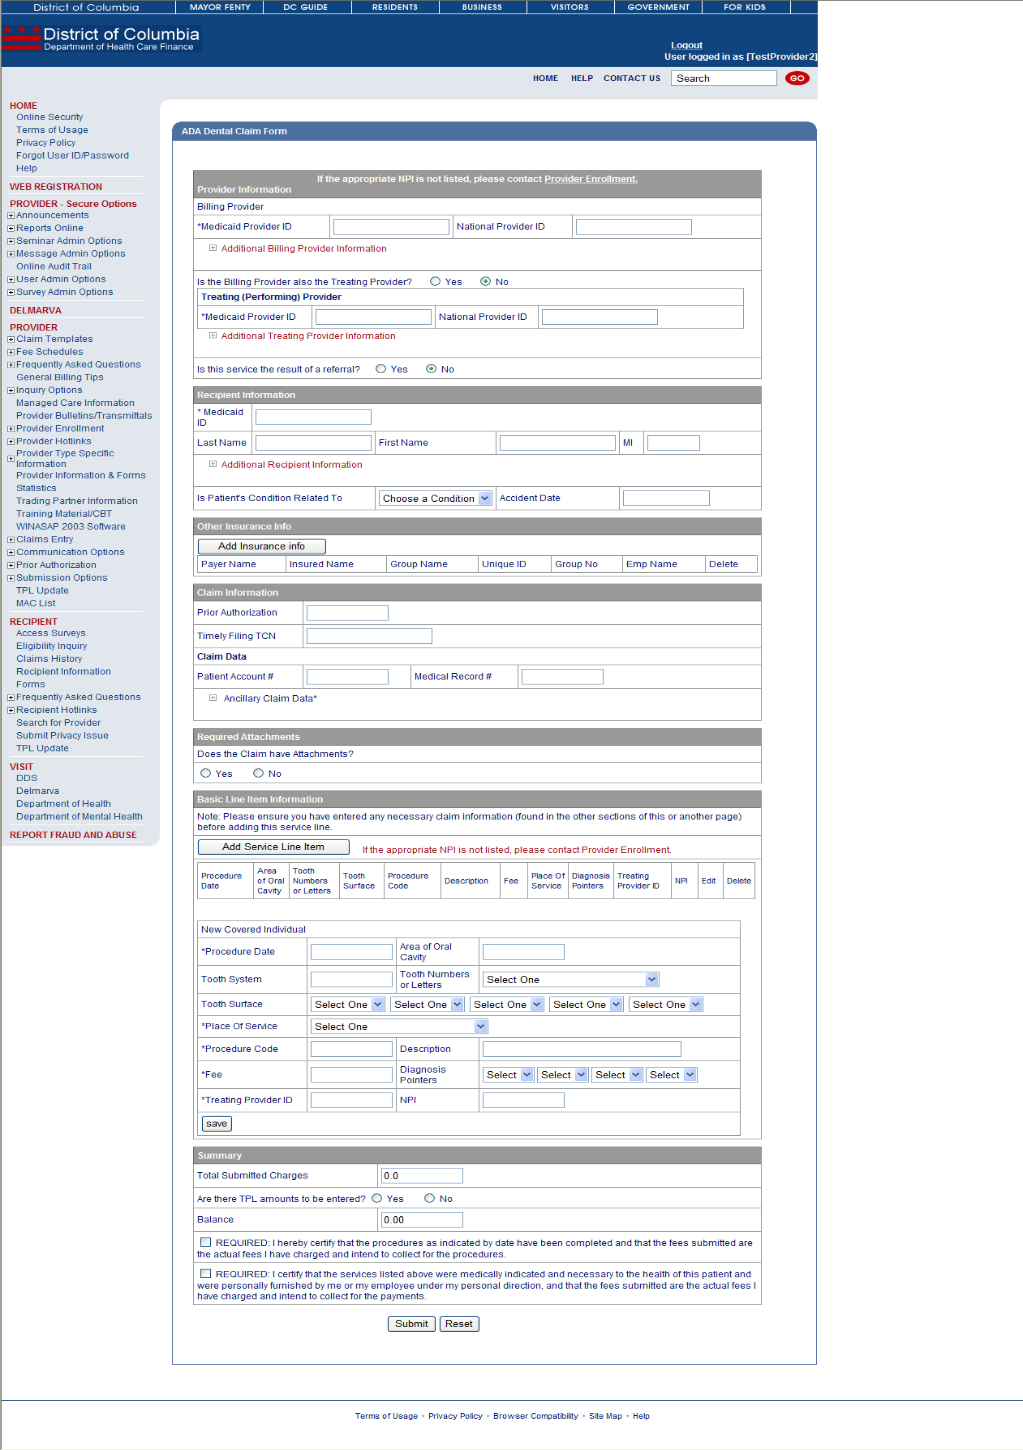
Figure 239: Claims Entry – Dental
Entering a Dental Claim: Web Page Details
- The user will click ADA Dental Claim Form. On the claims page, the user will enter the Recipient ID and Provider ID or NPI and click Submit.
- On the ADA Dental Claim Form page, the user will complete the appropriate claim fields. To add a line item, the user will click Add Service Line Item to receive new entry fields (These include tooth data and procedure code).
- After completing the line item data, click Save. To add another line item, complete the line item fields and click Save gain.
- After all fields have been completed, the user will click Submit to adjudicate the claim.
- After processing, the user is given the TCN and status of the claim. Also, any edits that posted to the claim will be displayed.
Entering a CMS-1500 Claim Image
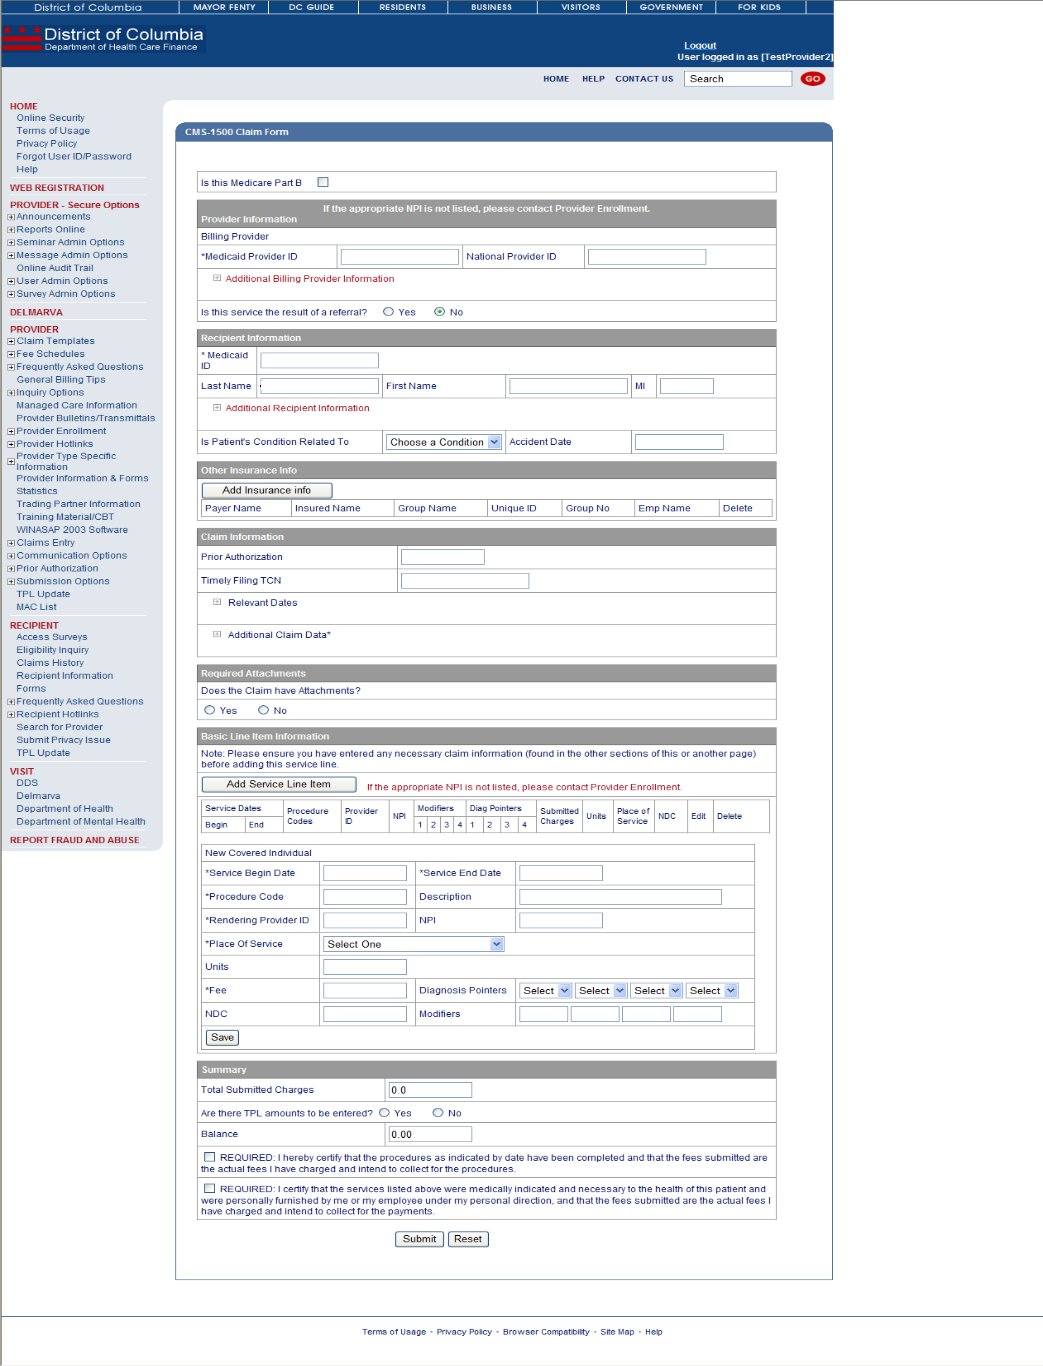
Figure 240: Claims Entry – CMS-1500
Entering a CMS-1500 Claim Details
- The user will click CMS-1500 Claim Form. On the claims page, the user will enter the Recipient ID and Provider ID or NPI and click Submit.
- On the CM-1500 Form page, the user will complete the appropriate claim fields. To add a line item, the user will click Add Service Line Item to receive new entry fields (These include service dates and procedure code).
- After completing the line item data, click Save. To add another line item, complete the line item fields and click Save again.
- After all fields have been completed, the user will click Submit to adjudicate the claim.
- After processing, the user is given the TCN and status of the claim. Also, any edits that posted to the claim will be displayed.
Entering a UB04 Claim Image
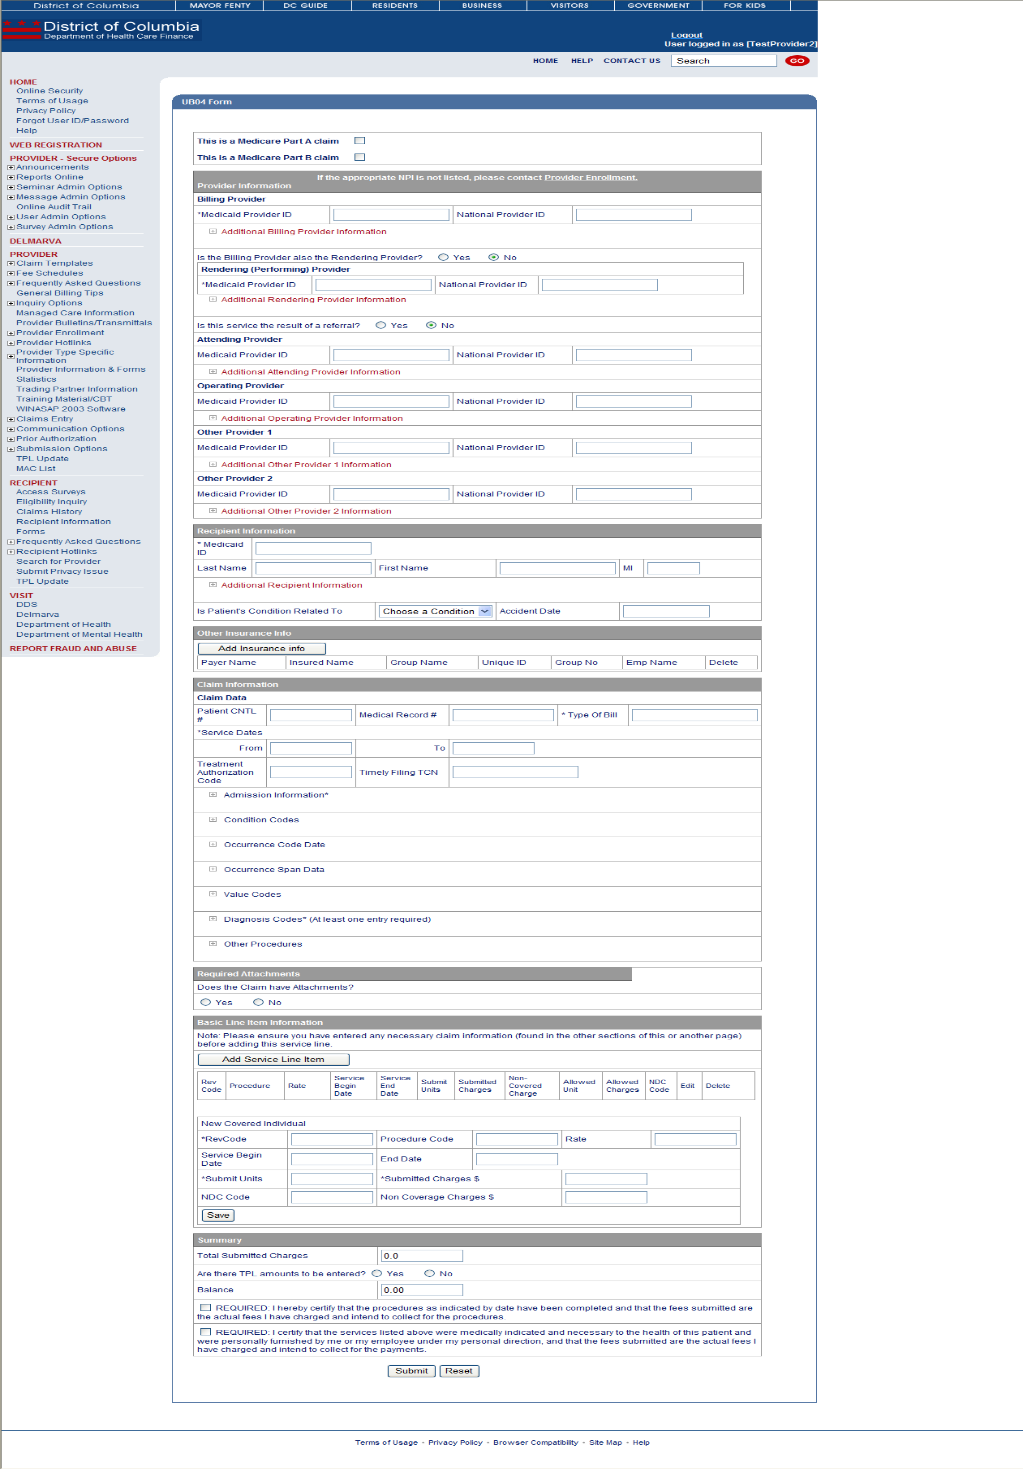
Figure 241: Claims Entry – UB04
Entering a UB04 Claim Details
- The user will click UB04 Claim Form. On the claims page, the user will enter the Recipient ID and Provider ID or NPI and click Submit.
- On the UB04 Form page, the user will complete the appropriate claim fields. To add a line item, the user will click Add Service Line Item to receive new entry fields (These include rev code and procedure code).
- After completing the line item data, click Save. To add another line item, complete the line item fields and click Save again.
- After all fields have been completed, the user will click Submit to adjudicate the claim.
- After processing, the user is given the TCN and status of the claim. Also, any edits that posted to the claim will be displayed.
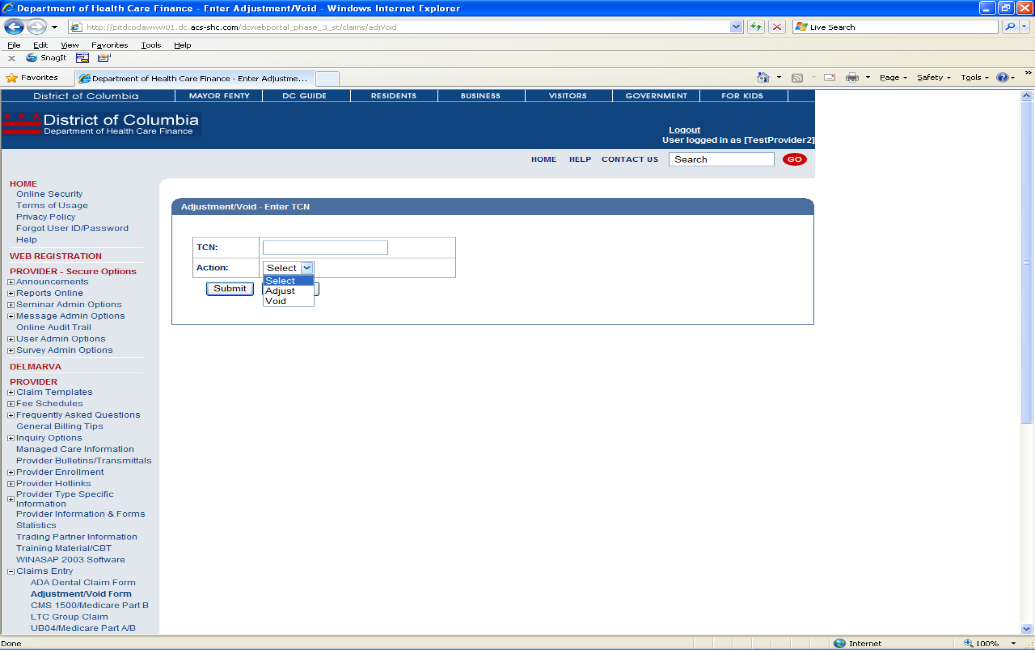
Entering an Adjustment or Void Image
Figure 242: Claims Entry – Adjustment/Void
Entering an Adjustment or Void Details
- The user will click Adjustment/Void Form.
- On the Adjustment/Void page, the user will enter the TCN, select Adjust or Void from the Action box, and click Submit.
- If the user chooses Adjust, the claim will display (in the appropriate format of Dental, CMS-1500 or UB04) with the data displayed as it was submitted on the original claim.
- The user will make any changes to the data and select an Adjustment/Void reason from the drop-down box at the bottom.
- After making all changes and selecting a reason code, the user will click Submit to process the Adjustment.
- After processing, the user is given the TCN and status of the claim. Also, any edits that posted to the claim will be displayed.
- If the user chooses Void, the claim will display (in the appropriate format of Dental, CMS-1500 or UB04) with the data displayed as it was submitted on the original claim. However, the claim will be protected and no changes may be made.
- The user will enter a Void reason from the drop-down box and click Submit to process the Void.
- After processing, the user is given the TCN and status of the claim. Also, any edits that posted to the claim will be displayed.
Entering an LTC Group Claim Web Page Image
Figure 243: Claims Entry – LTC Group Claim
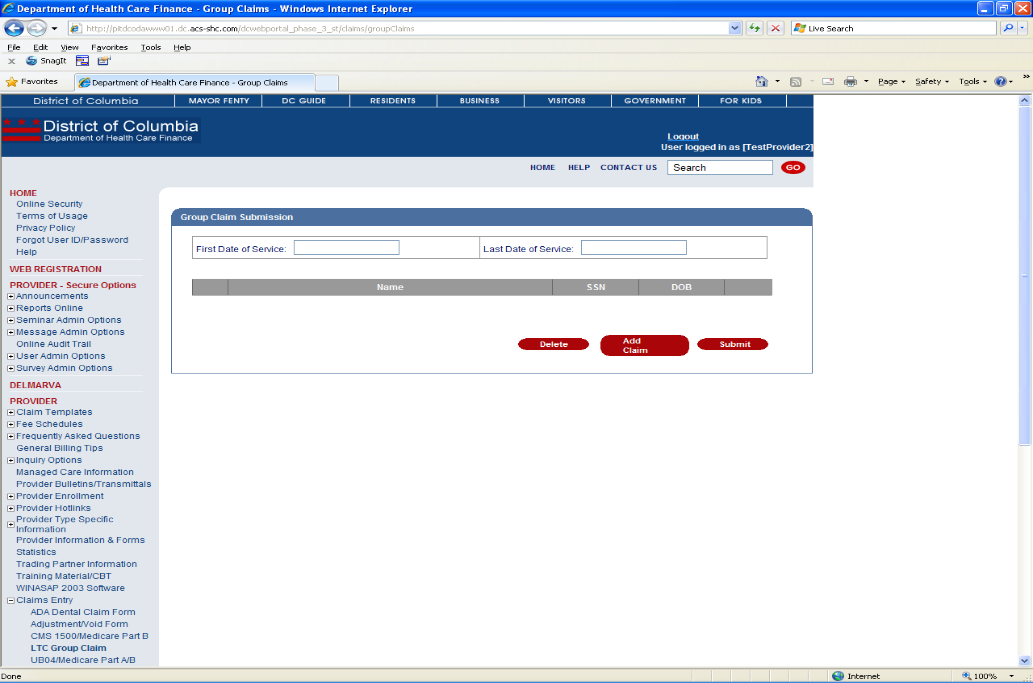
Entering an LTC Group Claim Detail
The purpose of the LTC Group Claim Submission function is to allow long term care providers to easily submit claims that are the same from month to month. This allows providers to pull back the previous month's claims and simply change the dates of service. Also, providers may add and remove recipients as needed.
- The user will click LTC Group Claim.
- On the Group Claim Submission page, the user will see all of the claims listed (LTC and Hospice) from the previous month.
- If no changes are required, the user will indicate the first and last dates of service and click Submit. A message will be displayed that the claims were submitted. The user may then access the Message Center to retrieve a report that lists all TCNs and statuses for the claims submitted.
- If changes are required (i.e., adding or removing recipients) the user will click the check box next to a recipient(s) and click Delete to remove them. Also, the user can click Add Claim to bring up a separate UB04 claim form.